Comet processing, new tools, new approach.
As PixInsight advances with new tools and plugins, so must our processing techniques and I believe this new approach to comet processing is showing some real promise.
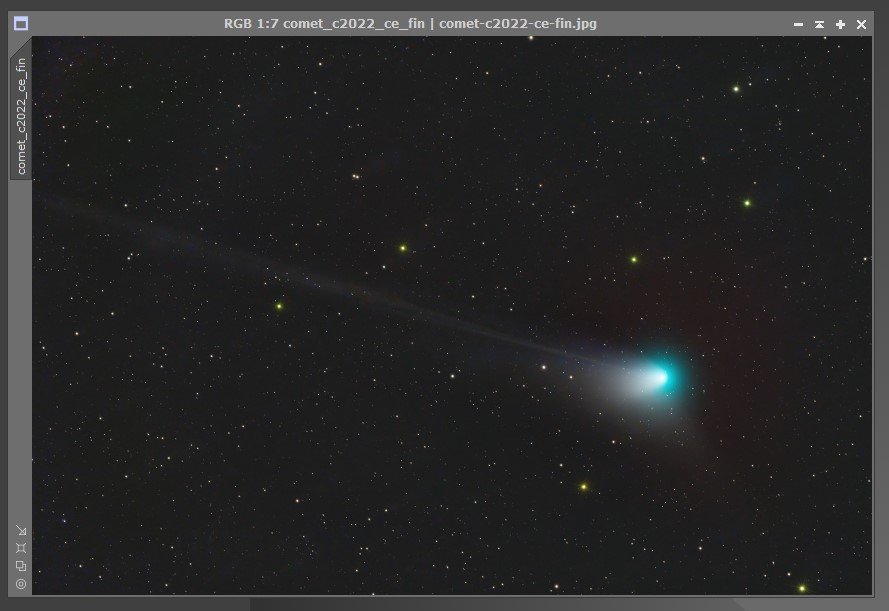
Here is my step by step comet processing technique used to process this image of comet c/2022 e3 (ztf).
Prerequisites: This is an advanced technique using several PixInsights processes and assumes you have a working knowledge of how to find, install and use them. Most of the processes being used are in the default configurations. I will not be going into detail on how to use each one unless it needs specific changes other than the defaults for this comet technique.
Plugins: Russell Croman’s Star Exterminator or Starnet++ can be used but it doesn’t work as well.
Step one: Initial processing with WBPP
Use Weighted Batch Processing (WBPP) on all your comet subs. We will need the RGB masters and registered files when it is done, so remember where those are saved.

Step 2: Creating a “good stars” and a “bad comet” image.
After the WBPP is done, find your masters folder, process your master or masters (RGB) if you shoot in mono, as you normally would.
Don’t worry about how the comet looks here, we simply want a good star to create the “no comet star” image.
If you're using a mono camera, use the channel combination tool to create an RGB image and process until you are happy with how the stars look, again don't worry about the comet at this point, we just need a star image.

Step 3: Creating a star field image with the comet removed.

Using your processed star image, run StarXterminator on it to remove the comet, don’t forget to check generate star image. When it’s finished, it will have created a perfect star field without the comet. Save the star image for later and you can close the original RGB image, you don't need it any more.

clean, no comet star field image
Step 4: Aligning your comet using the comet align process.
Open the CometAlignment tool and add all registered files from the WBPP run, these will be located in the registered folder created by WBPP.
Once loaded, double click the first image and select the comet head (you may need to give it a temp stretch to see), then select the last image and select the comet head on it.

Important, if you're shooting in mono, add all channels before selecting the apply global circle.
Pick an output directory and name it “cometAlignedImages” or something similar so you can find them in the next step.
Important, if you're shooting in mono, add all channels before selecting the apply global circle. Now select your output folder and hit the apply global circle.
Step 5: Creating starless comet images.
Open StarXterminator once more and make certain the Generate Star Image option is checked, then click the Process Batch button.

A new popup window will be presented, where you will need to select and output folder or the starless files to be saved. We don't need the star files so keep that option unchecked, then hit the “Select input files and execute” button.

This process can take several hours to run but the resulting comet images are so clean, almost no cloning is necessary.

Step 6: Creating a final starless comet image
Now use the image integration tool to stack the aligned comet images from step 5.
If shooting in mono, this will need to be for each channel separately, LRGB creating 4 new comet aligned masters.

Step 7: Creating a starless master comet image.
Using your processing method of choice, prepare your final starless comet image by combining and then stretching your comet image. I used the LRGB combine tool to first combine a rgb and then i use the tool again to add my LUM to the RGB. Then do some final tweaking of the background using ABE and even masking the comet head and running scnr on the background if you need to remove a green bias.
You should end up with something close to this.

Step 8: Creating the final comet with stars image.
Using pixel math, we can now combine the stars back into the comet for our final image.
The equation is simple: starlesscomet + starmask. Replace my image identifier names with your own and combine into a new image as rgb.

The final result is a clean, no artifacts comet image with nice stars background.

The final result is a clean, no artifacts comet image.
This new technique does take much longer but the prosses is straight forward and less confusing than the cometAlignments tool rejection method IMHP.
I hope you all can use this new processing technique and would love to see some of your results.
I’ve been a dedicated to Squarespace fan for 20 years. Love the product, people and company.